This article provides a detailed overview of the testing and optimization processes for advisors in the Strategy Tester of the trading platforms MetaTrader 4 and MetaTrader 5.
The need and demand for this type of material have long been anticipated.
Many beginners using the MetaTrader 4 and MetaTrader 5 trading platforms do not understand the essence and sequence of actions when working with experts.
Almost every day (without exaggeration), forums are filled with questions from beginners—how to install an Expert Advisor in the terminal, how to purchase an Expert Advisor in MetaTrader, what optimization is, and how to install it in the MetaTrader 4 and MetaTrader 5 tester, what a forward test is, etc.
This article intelligently answers these questions and allows readers to approach this fascinating work more professionally through a concrete example.
For a more detailed understanding of the testing and optimization processes, references to accompanying articles and pages of the MQL5 community site are provided as the material is presented.
MetaTrader 5: Testing of Expert Advisor in the Strategy Tester
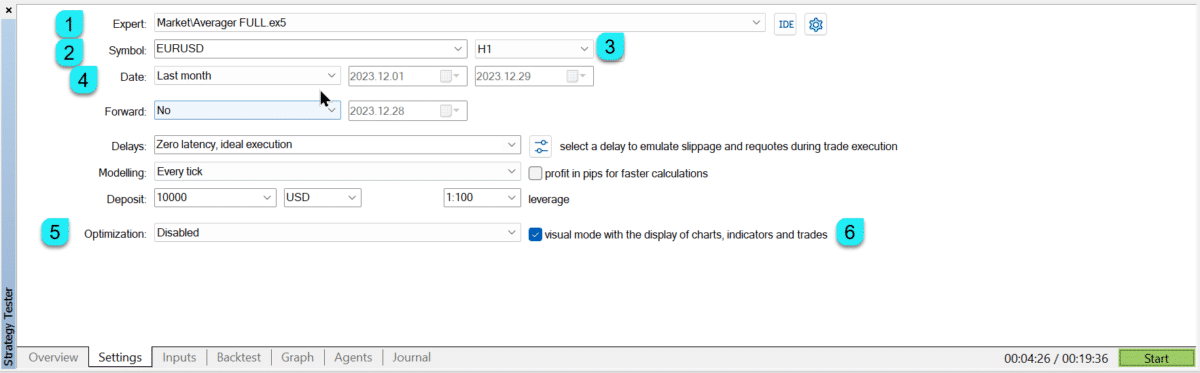
Setting up the Strategy Tester:
Select an Expert Advisor from the list.
Set the currency pair you will use for the test.
Choose M1 as the TimeFrame.
Set the date range, for example, 1 month.
Optimization: Disabled!
Enable Visual Mode.
Set the Deposit to an amount you will start trading with. Do not set it too low or too high!
Set the Leverage you will use for trading.
Ensure Every tick is based on real ticks!
Setting up an Expert Advisor in the Strategy Tester
To start testing, press the “START” button.
To monitor the progress of the test, open the Results tab and observe the testing.
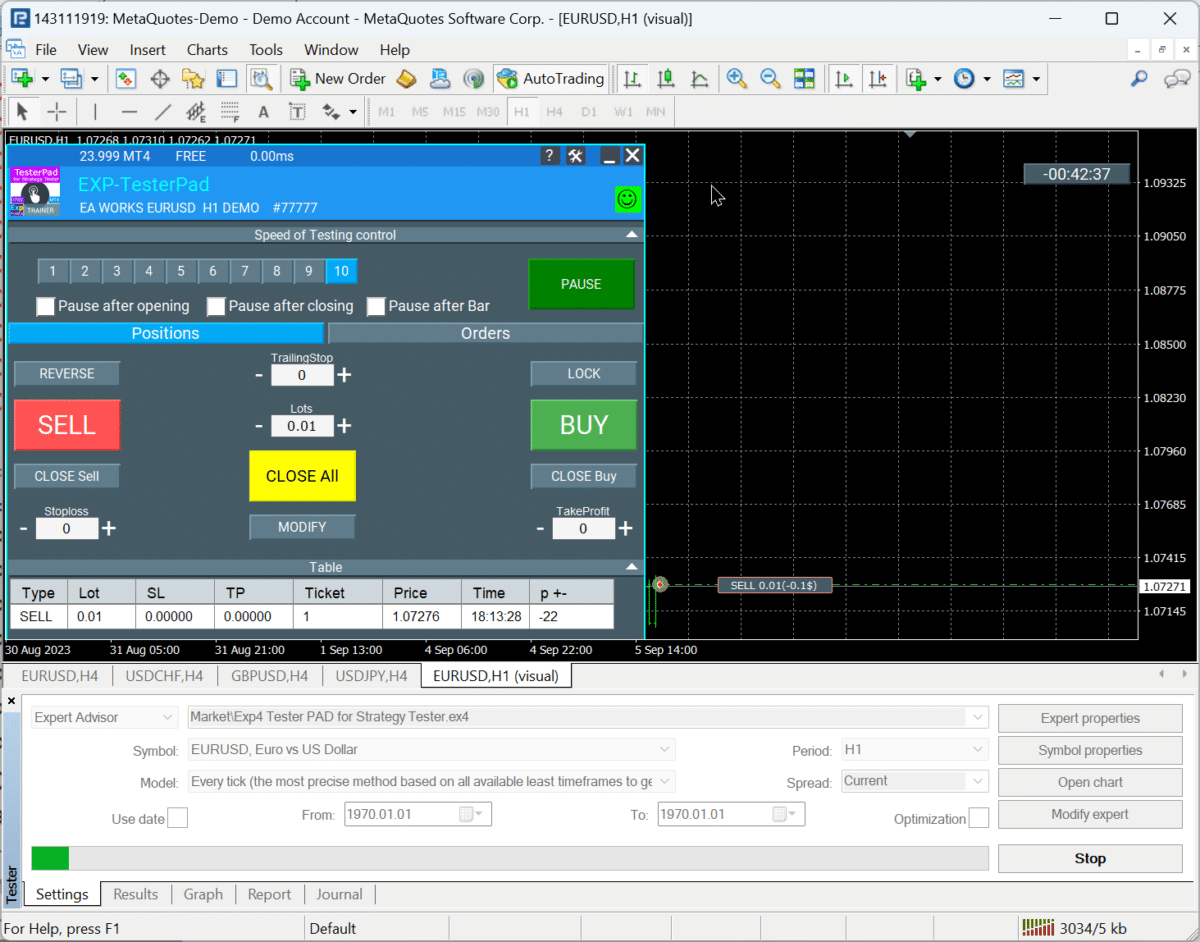
For Example:
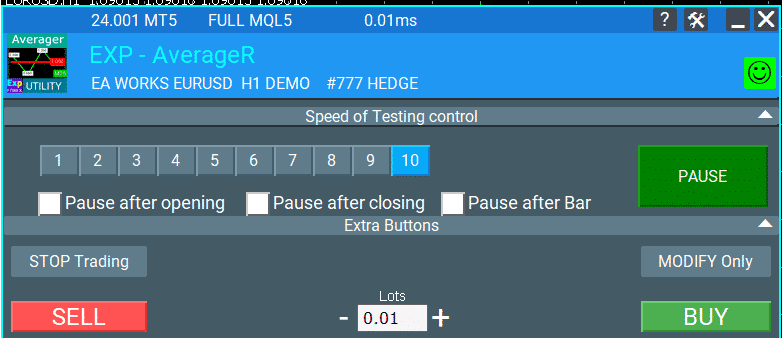
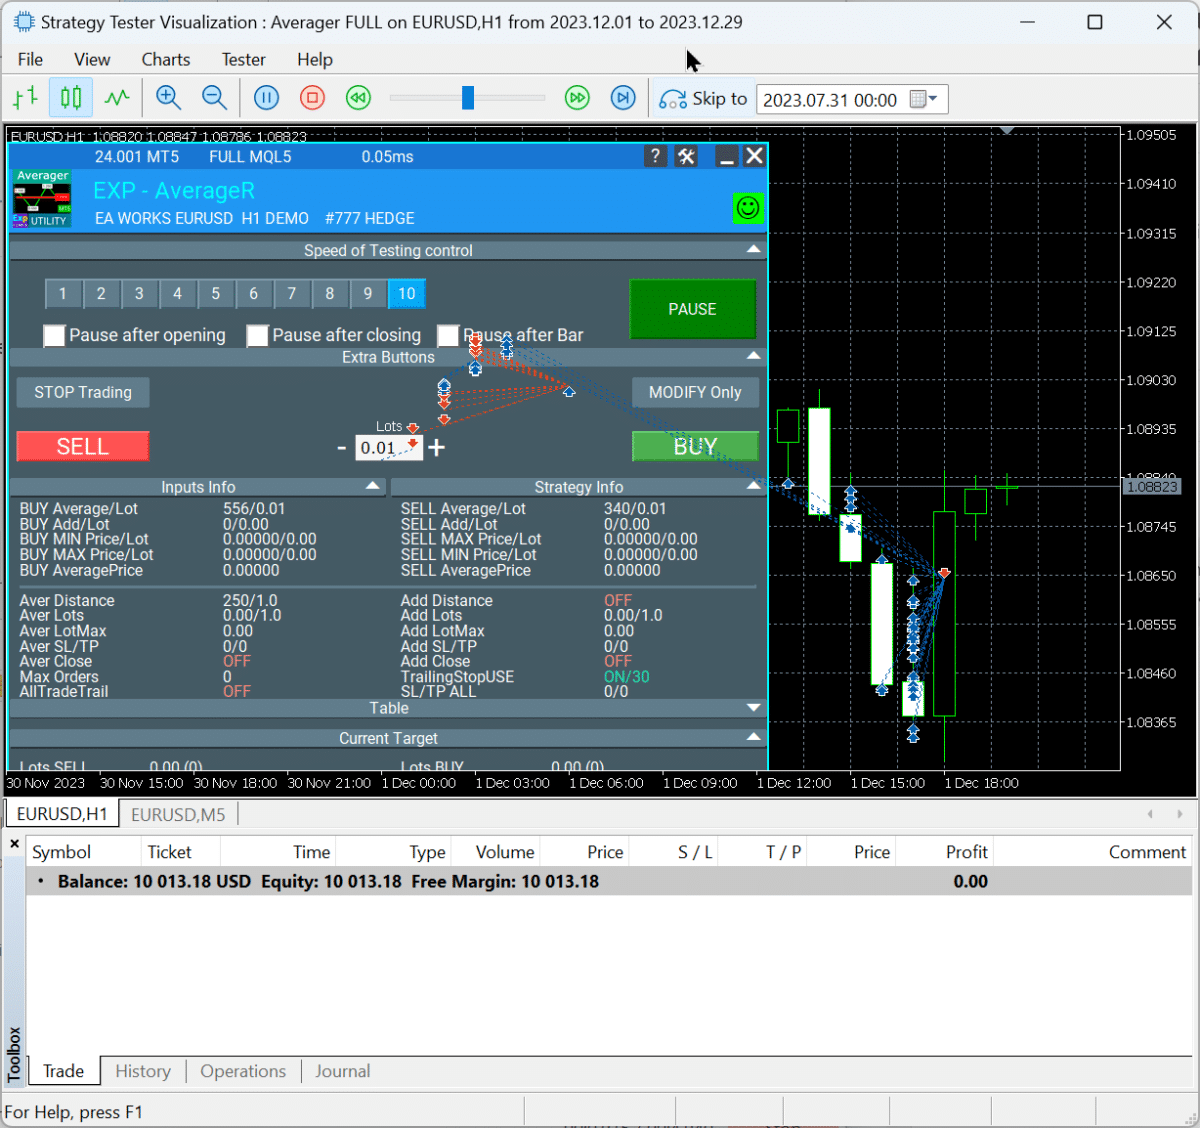
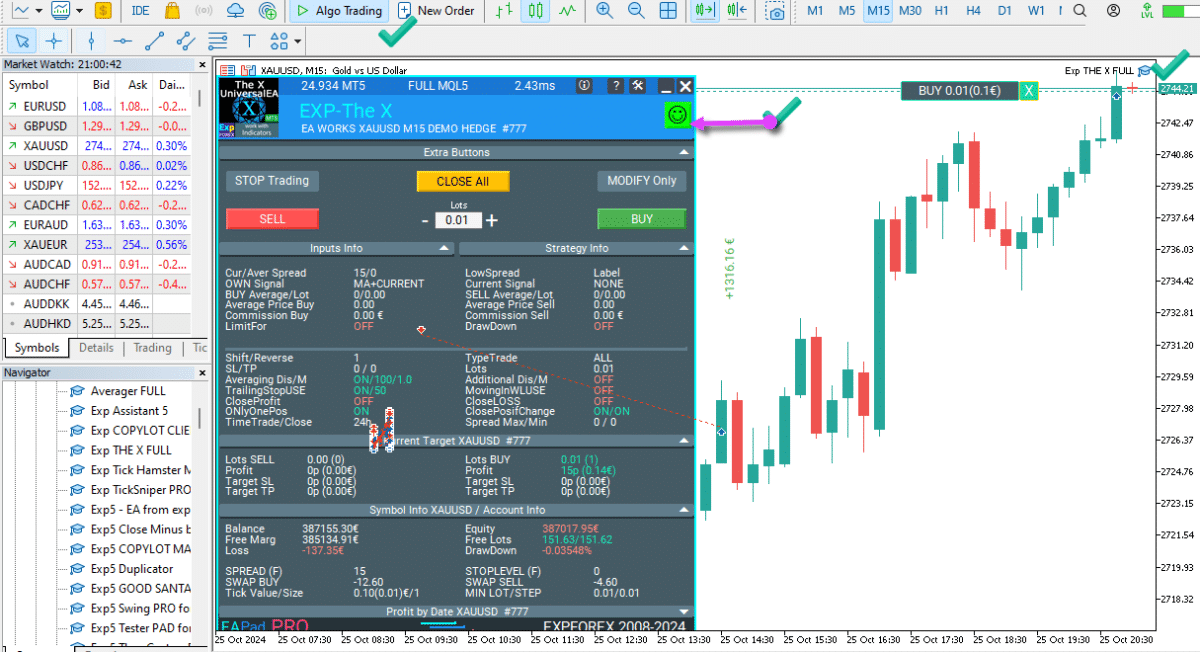
Each of our Expert Advisors can be tested in the Strategy Tester. For this purpose, in Visual Mode, we have added additional controls. For example:
You can read more about the controls in our article Exp – EAPADPRO.
Our dashboard has a unique code that cannot be added to the experts you purchase in open source!
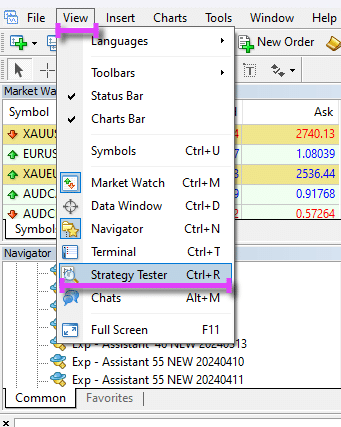
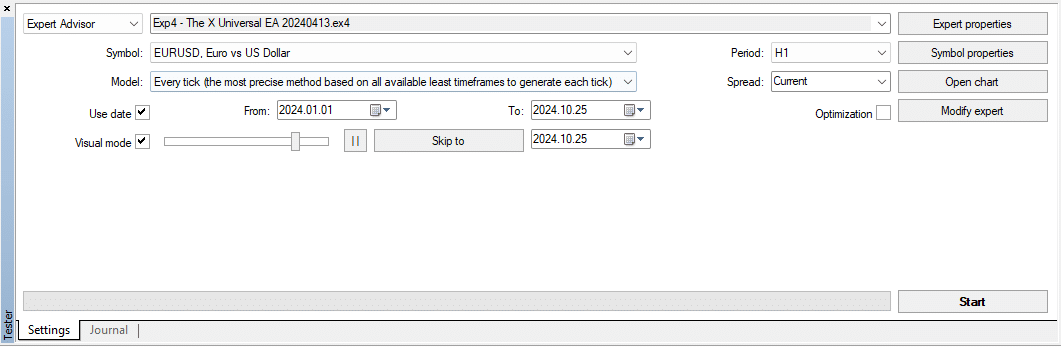
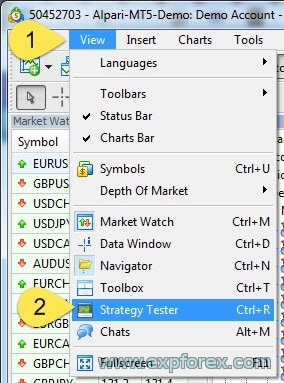
The First Thing You Need to Launch a Strategy Tester:
After opening the Strategy Tester, you will see the Strategy Tester tab.
Fields for Setup:
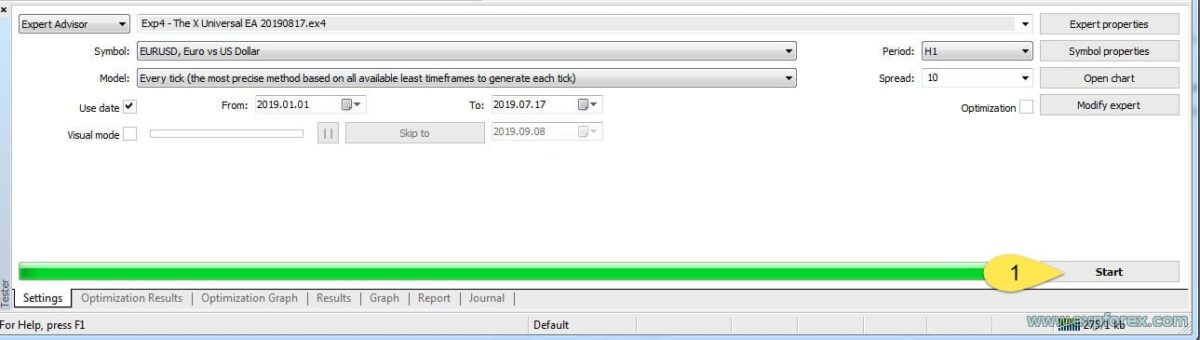
Expert Advisor – Choose the advisor you want to test from the list. Symbol – The symbol for testing. Model – Testing model. You can choose one of three methods for modeling historical data:
At the Opening Prices (Fast Method on the Formed Bars) Some mechanical trading systems do not depend on intra-bar modeling features; they trade on formed bars. You can determine that the current price bar is fully formed by the appearance of the next bar. This simulation mode is intended for such experts. In this mode, the opening of the bar is first modeled (Open = High = Low = Close, Volume = 1), allowing the expert to accurately identify the end of the formation of the previous price bar. Testing is launched on this nascent bar. At the next step, a fully formed current bar is generated, but testing is not performed on it!
Control Points (Using the Nearest Smaller Timeframe) The Control Points modeling method is designed for a rough assessment of experts that trade within the bar. This method requires historical data from the nearest smaller timeframe. In some cases, the data from a lower timeframe do not completely cover the timeframe being tested. If there is no data from a smaller timeframe, bar development is generated based on predefined wave patterns, as was the case in the third version of the MetaTrader 3 client terminal. Once historical data from the smaller timeframe is available, interpolation is applied to these data. However, the existing OHLC prices of the smaller timeframe act as control points. In most cases, the results of testing experts using the control points method can only be considered estimates and not final results. Such results serve as an intermediate evaluation.
All Ticks (Based on All Available Smallest Periods) This mode allows the most accurate modeling of price movement within the bar. Unlike “Control Points,” the All Ticks method uses not only the nearest smaller timeframe but also all available smaller timeframes to generate data. If multiple timeframe data are available simultaneously for a time range, data from the smallest timeframe are used for generation. Similar to the previous method, control points are generated based on OHLC data from the smallest available timeframe. Price movement between control points is generated using interpolation based on predefined templates, making it highly desirable to have minute data covering the entire test range. It’s possible for several identical ticks to be generated consecutively. In such cases, duplicate quotes are filtered, and the volume of the last quotation is retained. Be aware of the potentially large volume of generated data, which can impact the operating system’s resources and testing speed.
Use Date – The date range allows you to test the Expert Advisors not on all available data, but only within the selected time interval. This is convenient if you need to explore a specific part of the historical data. Limiting the date range can be used not only when testing an expert but also when generating a test sequence of bars (a file of simulated data used for testing). Often, there is no need to generate data from the entire history, especially in simulation modeling, where unused data can be substantial. Therefore, if the date range option is enabled during the first generation of the testing sequence, bars outside the specified range are not generated but simply overwritten into the output sequence. The data is not excluded from the sequence to ensure that indicators can be correctly calculated on the entire obtained history. Note that the first 100 bars are also not generated. This restriction does not depend on the set date range.
To enable the date limit, select the “Use Date” checkbox and specify the required values in the “From” and “To” fields. After configuring all settings, press the “Start” button to begin testing. Once testing begins, you can view the estimated time for completion at the bottom of the window.
Visual Mode – Visual Mode allows you to monitor the test on a separate terminal graph. When enabled, a visualization window opens in the terminal, displaying the chart and trades opened by the Expert Advisor (EA).
Period – TimeFrame for testing. If your Advisor operates on bars or indicators, choose the timeframe used for real trading. Spread – Test Spread. In the MT4 Terminal, the spread can only be fixed. Set this spread in this field. Attention: Results will differ from a real account if your real account has a floating spread. Attention: It is not recommended to set spread = 0 because, with each test, the spread will be set based on the broker’s current spread, which may be floating.
Optimization – Check this box if you want to optimize the Expert Advisor in the Strategy Tester. However, you need to configure the Expert Advisor for optimization beforehand.
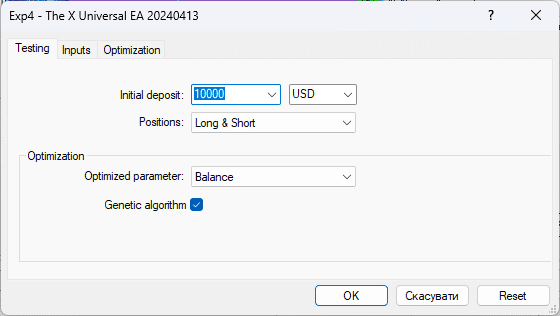
Test Parameters Selection Window
Initial Deposit – The initial account balance for testing. You can specify an amount sufficient for the advisor’s operation. Positions – Select the type of orders that will be opened. You can choose “Only Buy” or “Only Sell”. If you select “Only Buy,” the advisor will be prohibited from opening Sell positions. Optimization – A block for managing the type of optimization, such as based on balance, profit factor, or drawdown.
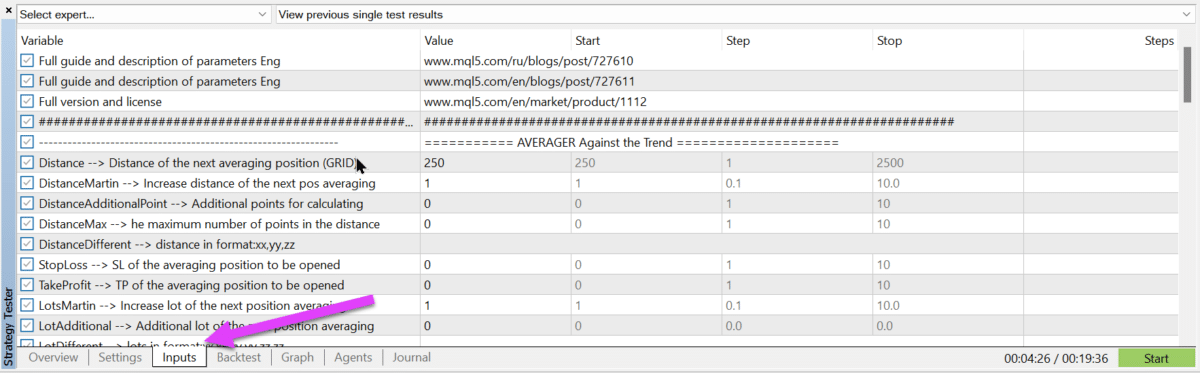
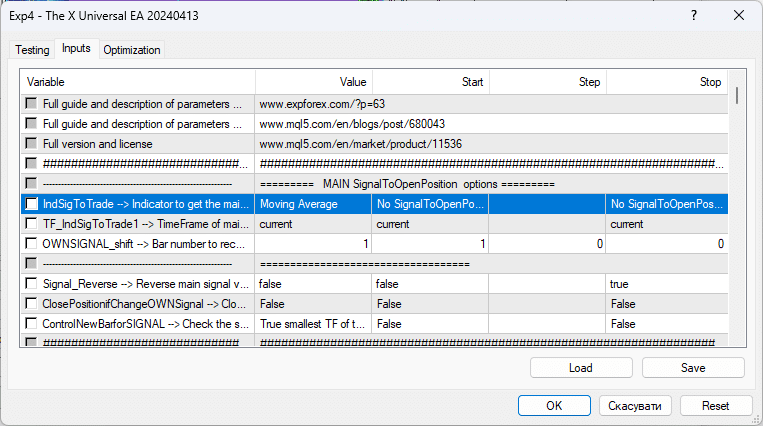
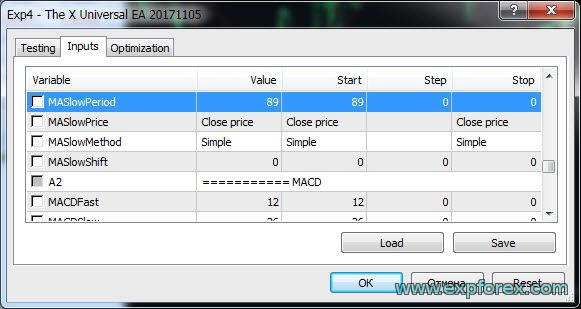
Expert Settings Window:
You configure the Expert Advisor for testing in this tab.
Only the Value field can be configured; the remaining fields are only for optimizing the Expert Advisor.
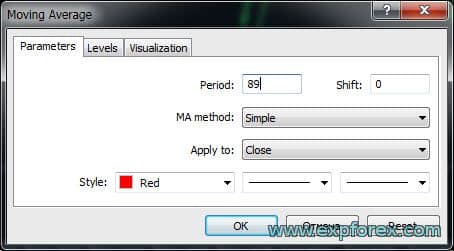
Attention: Be careful if your Expert Advisor has indicator settings and you are viewing the test in Visual Mode.
The indicator settings in the Expert Advisor should match the indicator settings on the chart.
In other words, the advisor trades based on the indicator set in the external variables.
If you decide to place the indicator on the chart, please set it up as it was done in the Expert Advisor.
Otherwise, you will encounter the following issue:
Why is there no signal on the indicator, and has the advisor opened a trade?
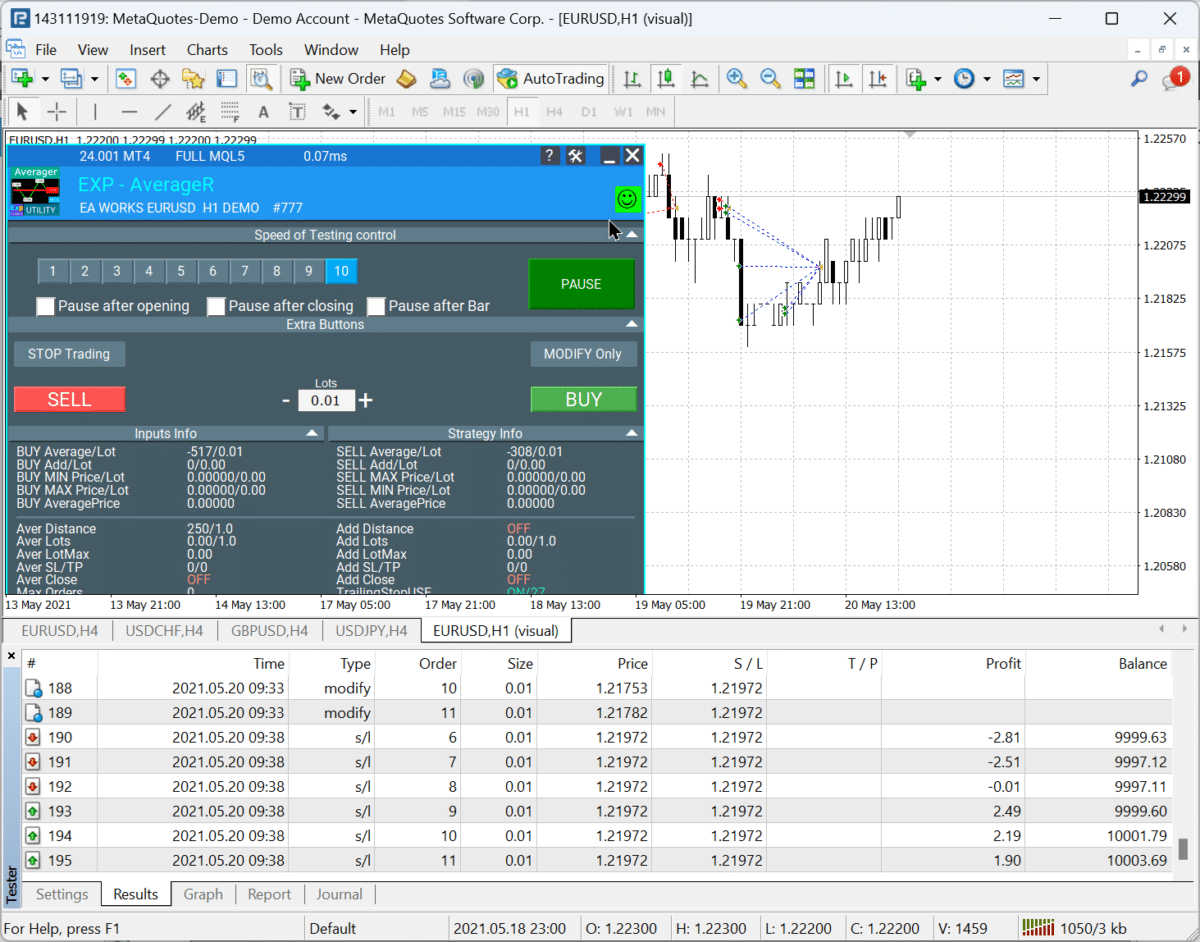
To Start Testing, Press the “START” Button
To monitor the progress of the test, open the Results tab and observe the testing.
For Example:
Each of our Expert Advisors can be tested in the Strategy Tester. For this purpose, in Visual Mode, we have added additional controls. For example:
You can read more about the controls in our article Exp – EAPADPRO.
Our dashboard has a unique code that cannot be added to the experts you purchase in open source!
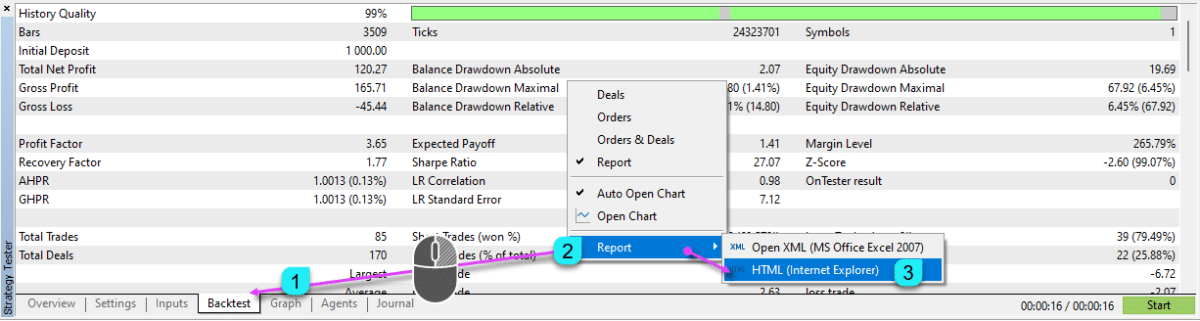
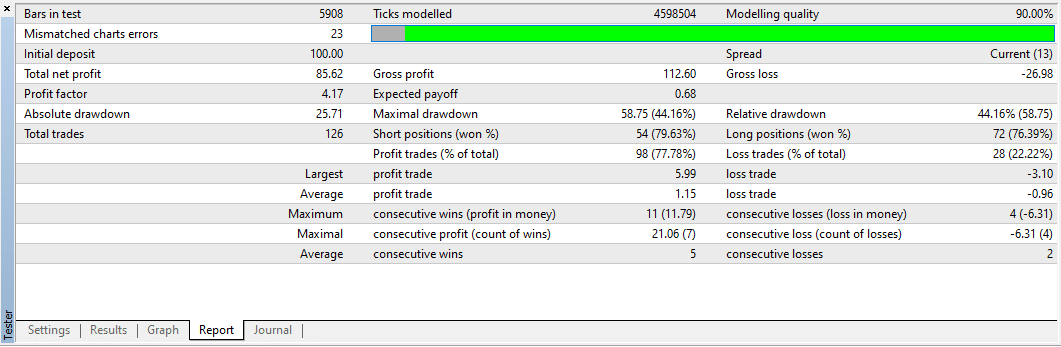
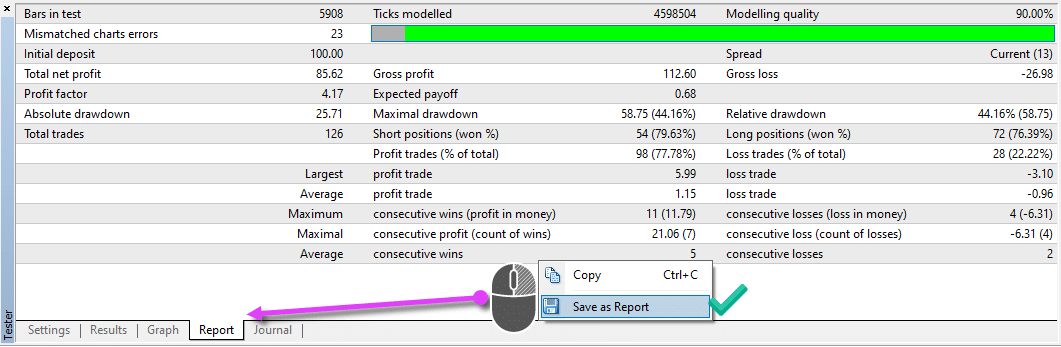
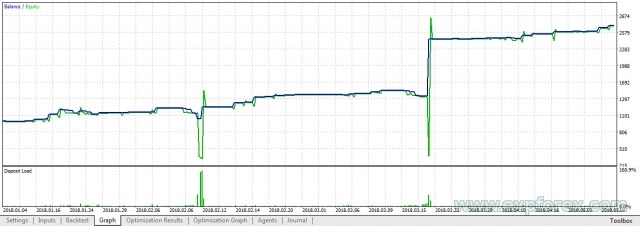
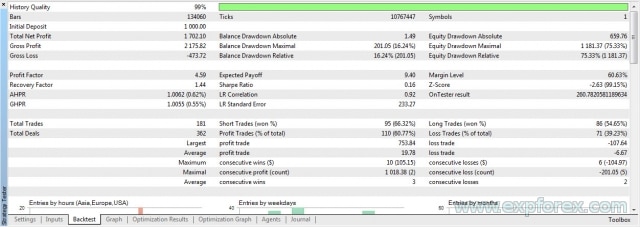
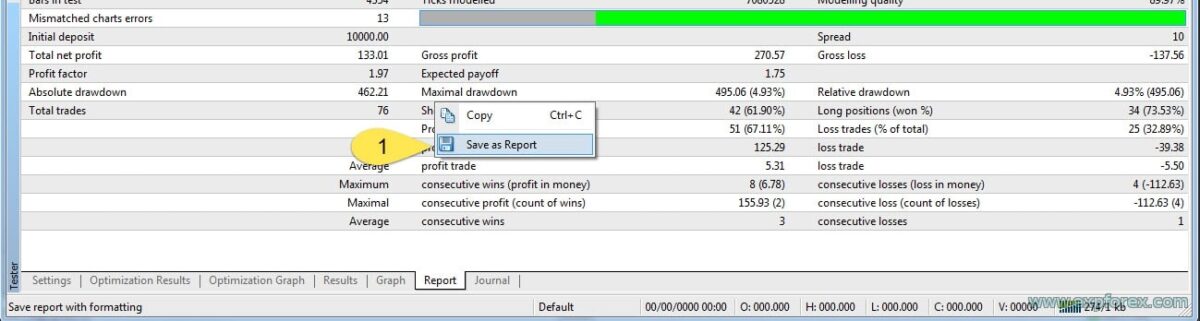
After testing, go to the “Reports” tab to view the results of testing your Expert Advisor in the Strategy Tester.
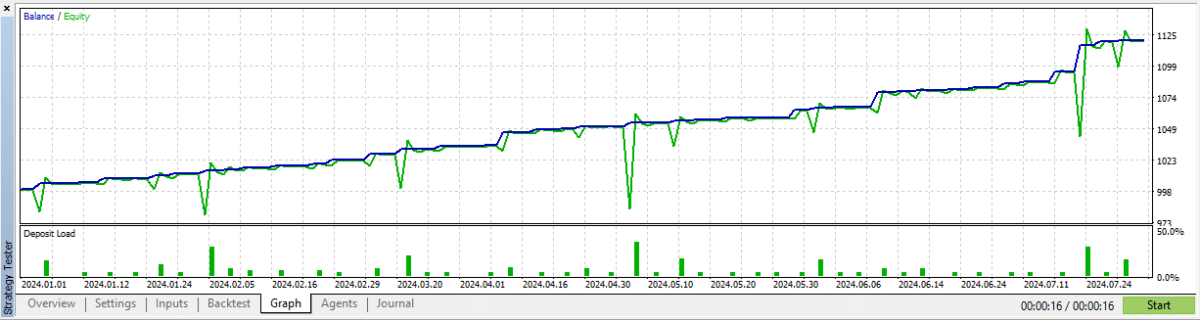
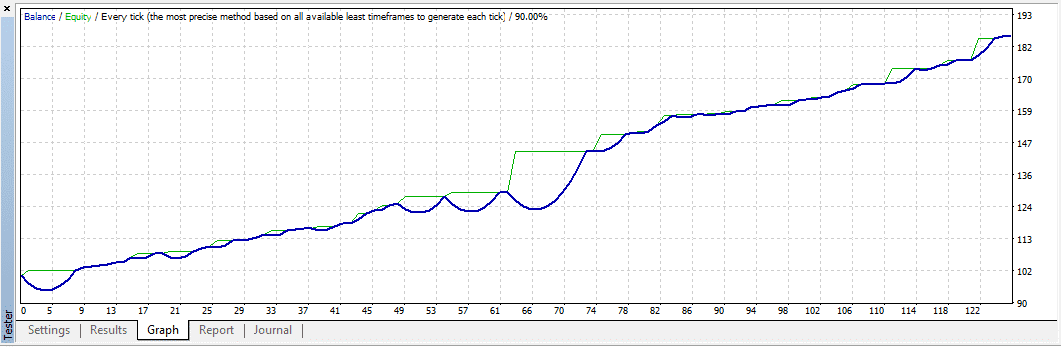
In the “Graph” tab, you can observe a graph of the balance and equity changes during the testing period.
To save the test report, go to the “Results” tab and right-click on the data. You will see the menu for saving the report:
MetaTrader 5: Setting Up Optimization and Saving the SET File
Our advisors use the same algorithm of signals and functions.
However, due to differences between the MT5 and MT4 terminals, there may be performance discrepancies.
The Strategy Tester in the MT5 terminal is currently the most technologically advanced and accurate.
The most important feature of the MetaTrader 5 terminal and Strategy Tester is the ability to test using real ticks. The spread and stop levels in MetaTrader 5 are floating, meaning that testing in the MT5 Strategy Tester is as close to live trading as possible.
We will not explain testing and optimization in the MetaTrader 4 terminal! You already know how to test it. The optimization process is similar to the MT5 process (Settings and Startup).
But the main feature of the Strategy Tester in MT5 is, of course, the ability to optimize in the cloud using the MQL5 Cloud Network.
The cloud allows optimizing the Expert Advisor using thousands of other computers at a minimal cost. It’s very affordable and fast. Therefore, I highly recommend using MQL5 Cloud.
In the archive with the Expert Advisor, you will find several files with settings for optimization. These are just examples, but they will show you how to configure optimization.
Remember: Each currency pair and broker have their own trading conditions (spread, swap, commission, settlement method, execution, account type), so the optimization results may vary!
To make the results more consistent, you need to turn off Random Delay. It is not required for optimization!
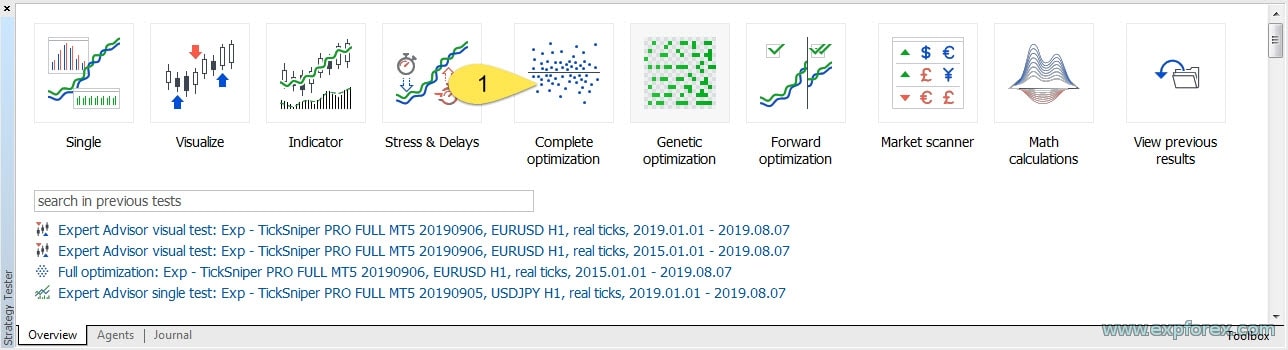
To optimize an expert, you need to open the Optimizer (Strategy Tester) MT5:
Select the Complete Optimization mode (new version of the MetaTrader 5 terminal).
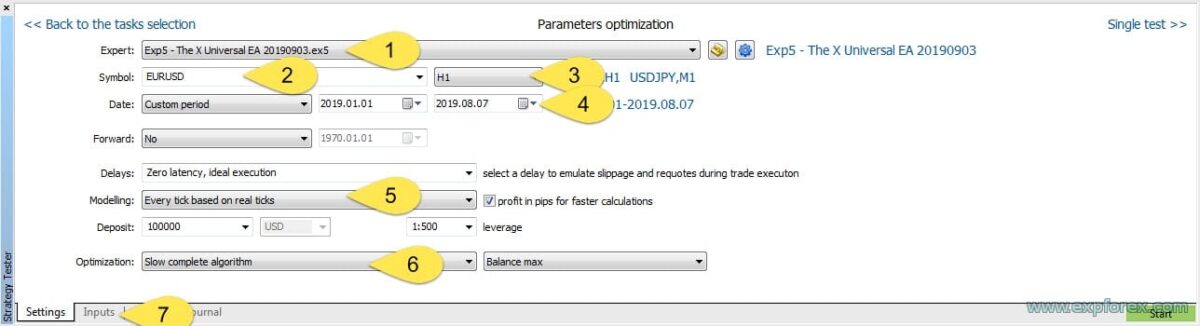
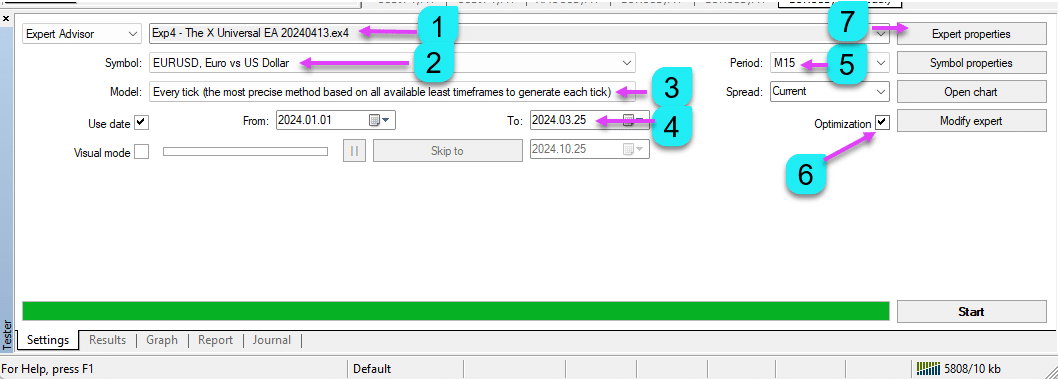
After that, we need to adjust our Strategy Tester for optimization:
Choose an expert for optimization.
Select the trading symbol (currency pair) that you want to obtain results for.
Timeframe
Period optimization (can be optimized over the last year; optimizing for over 10 years makes no sense!)
Ensure to choose the model: “Every Tick is based on real ticks!“
Choose the type of optimization = Exhaustive search parameters (Slow Complete Optimization)
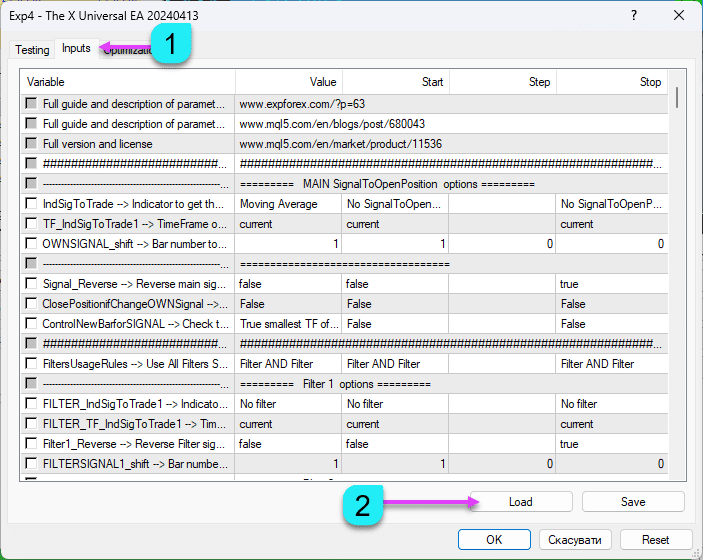
Enter the Inputs settings for input parameters.
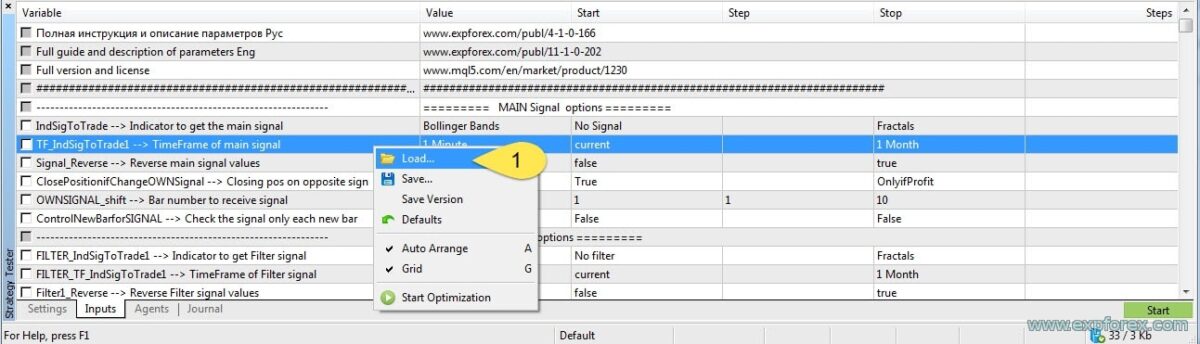
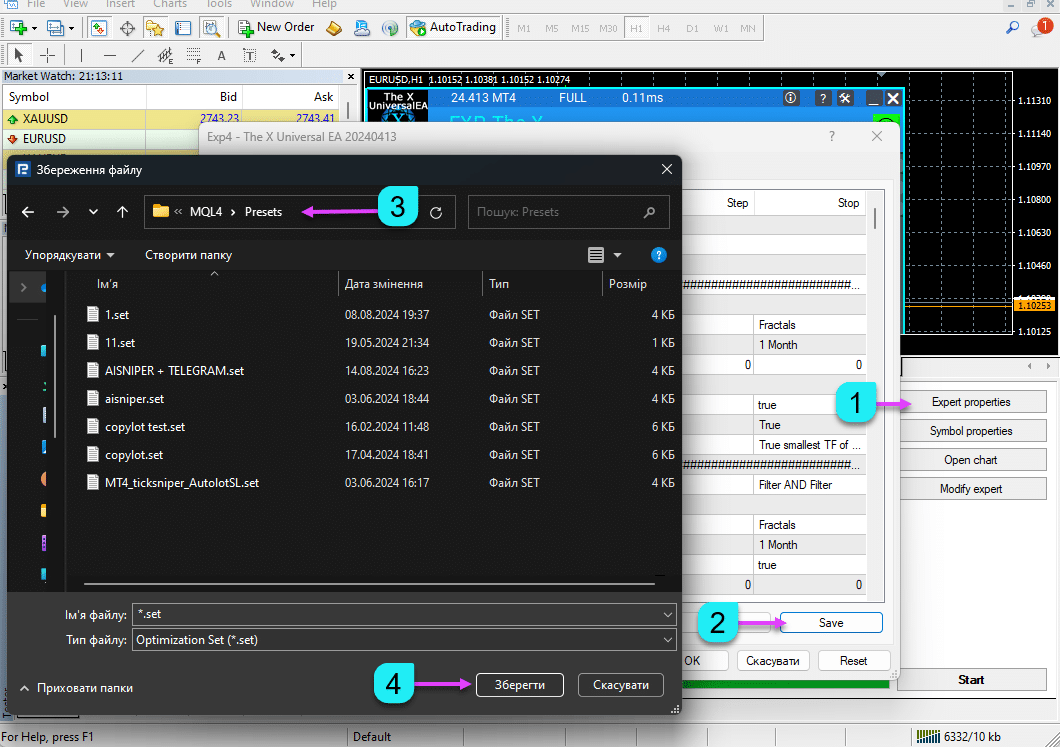
Load your file to optimize or configure the settings to your liking!
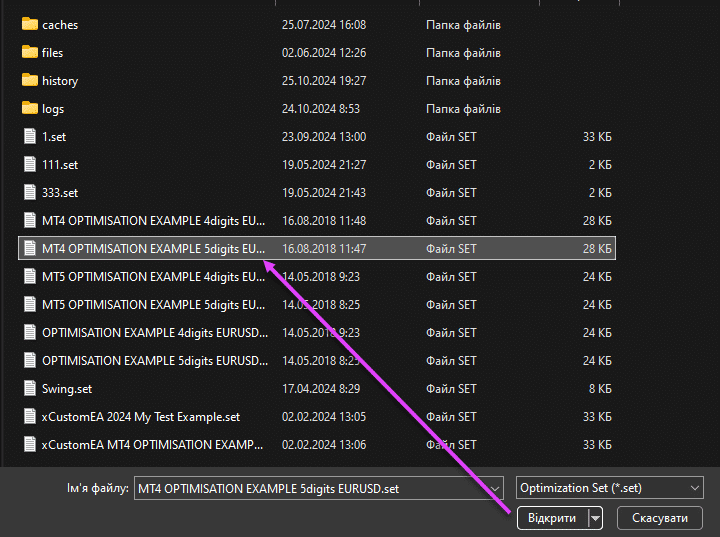
Click the right mouse button – Load (Load)
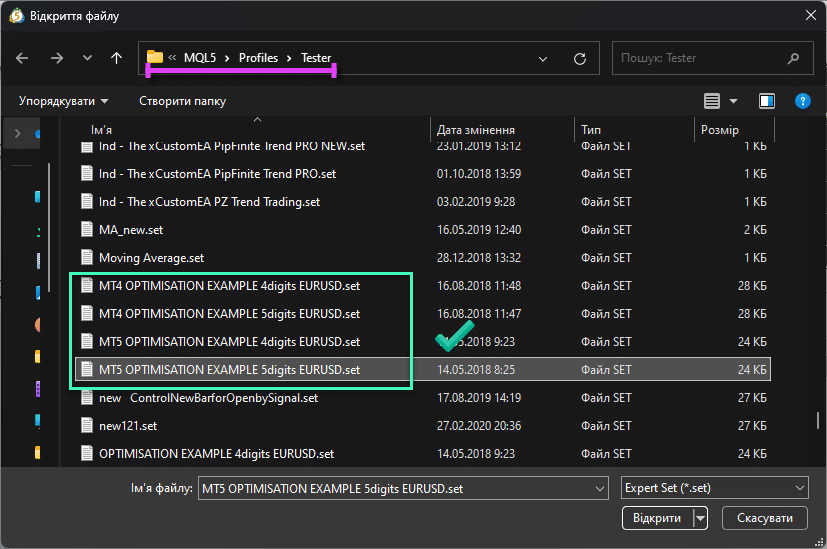
Choose the path where you saved our files and select the file with the number of digits in price from your broker (4-digit or 5-digit broker)
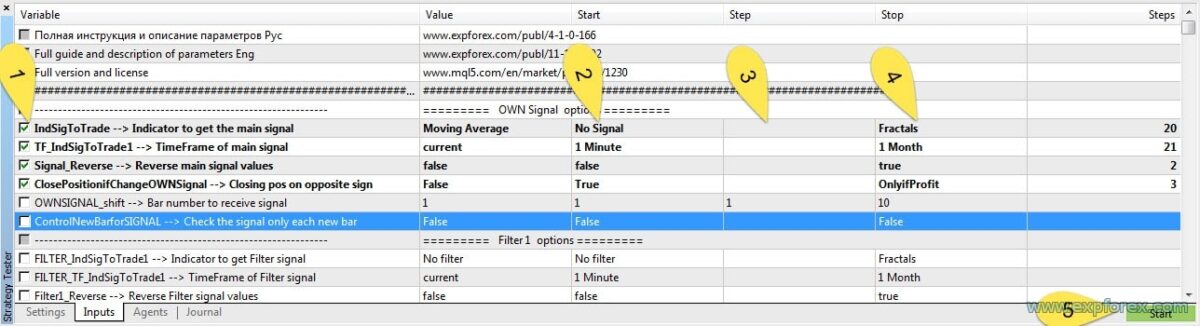
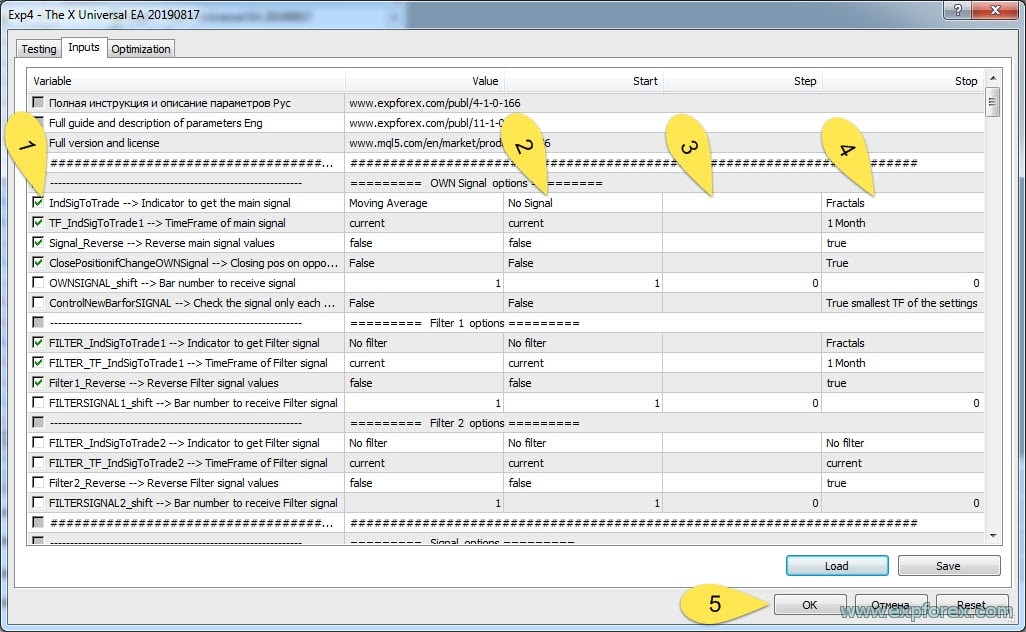
Configuring Optimized Parameters:
After loading, you will see our optimization options.
Check or uncheck the options you want to optimize. (By default, the file is set up to optimize all important parameters)
Start (Start) – The initial value of the parameter to optimize.
Step (Step) – The incremental change in the parameter with each optimizer run.
Stop (Stop) – The final value of the parameter to optimize.
Click Start to begin the optimization! It can take anywhere from 1 hour to 1 week! You can also use the cloud to optimize faster!
Remember! The more parameters and steps you optimize, the more time is needed to complete the testing and optimization!
Value (Value) – This is a fixed value. The Advisor will use this value if the parameter is not optimized or during testing!
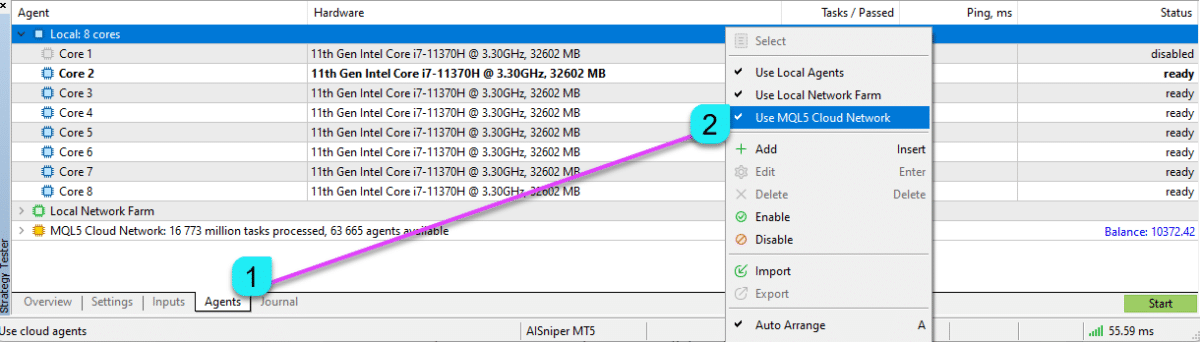
Enable Cloud Optimization
I highly recommend enabling Cloud Optimization!
This way, my processor remains free, and my computer does not slow down during optimization. Additionally, the cost of one pass in the cloud is less than 0.01 cents!
Press the START button and continue with your tasks!
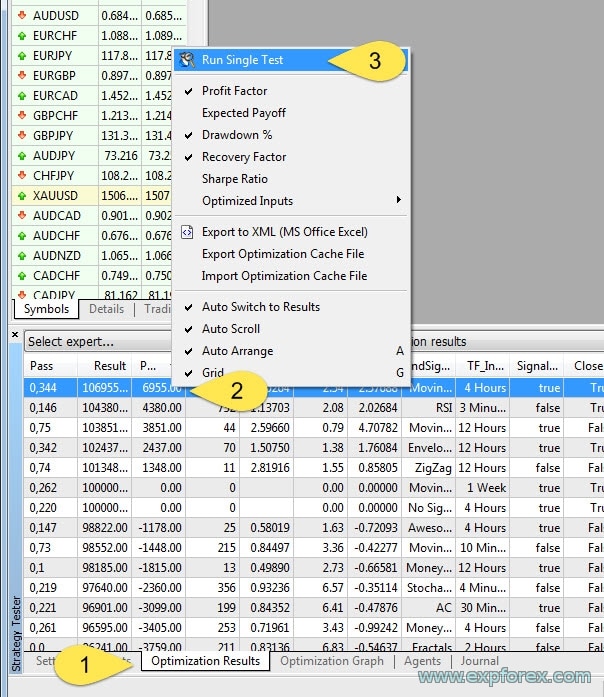
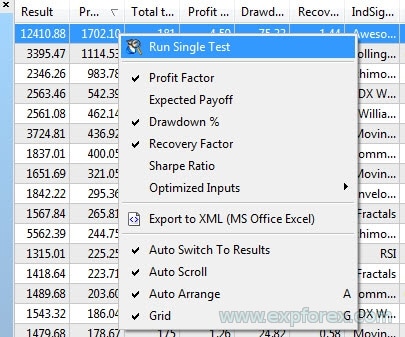
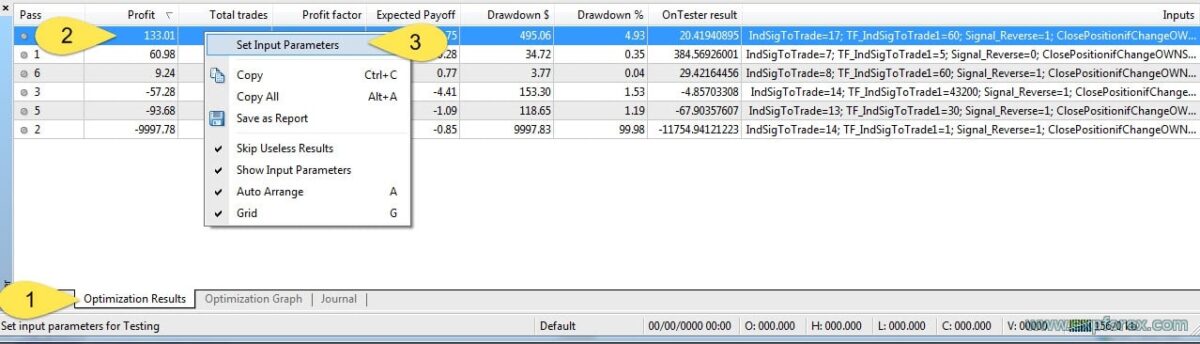
Selecting Results and Saving the “.Set” File
After receiving the optimization results, you can select the desired options and save the SET File for future use.
Go to the Optimization Results tab.
Choose the desired result.
Run a single test.
Review the result:
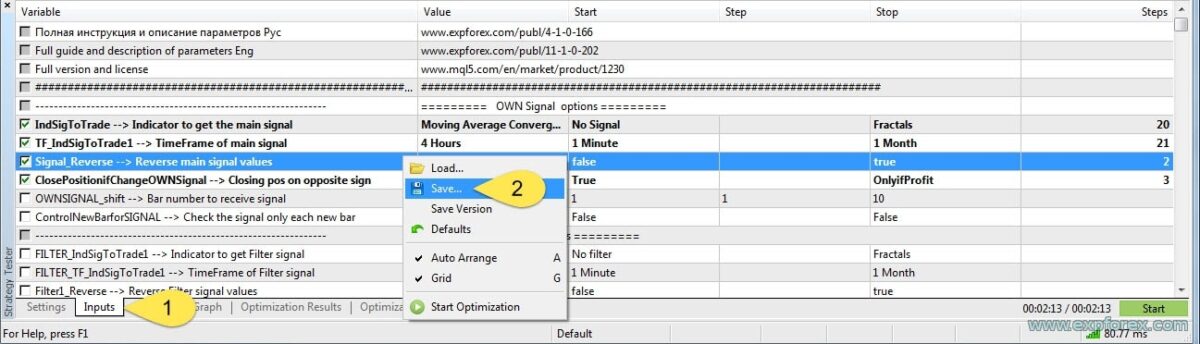
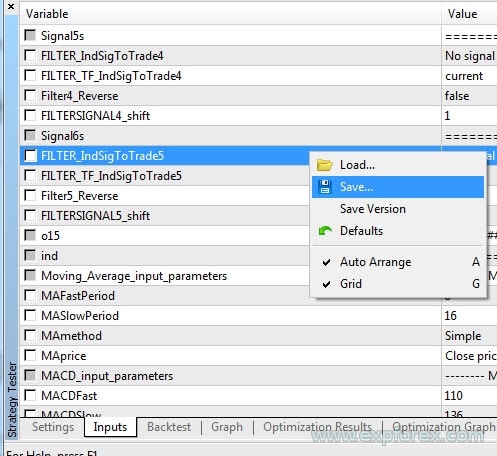
After that, go to the Settings tab 1 (Inputs) and save the SET FILE 2 (Click the right mouse button).
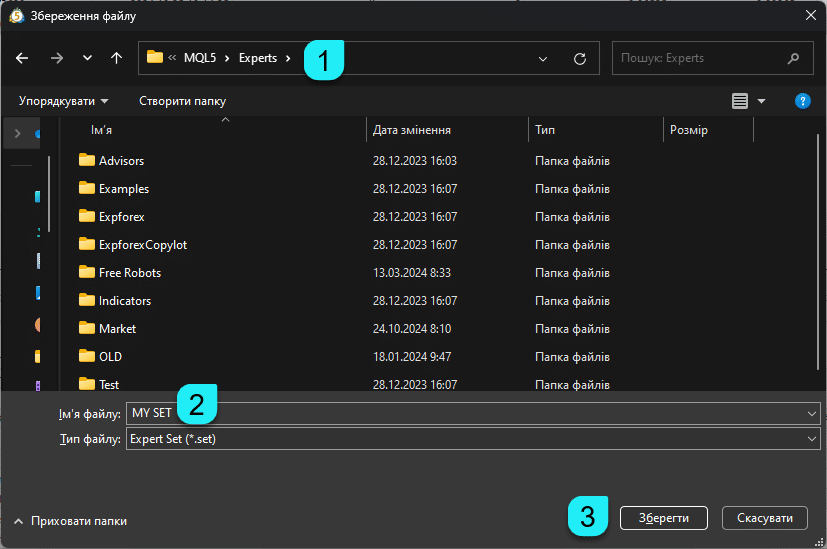
Save the settings file in a location where you store all your important files!
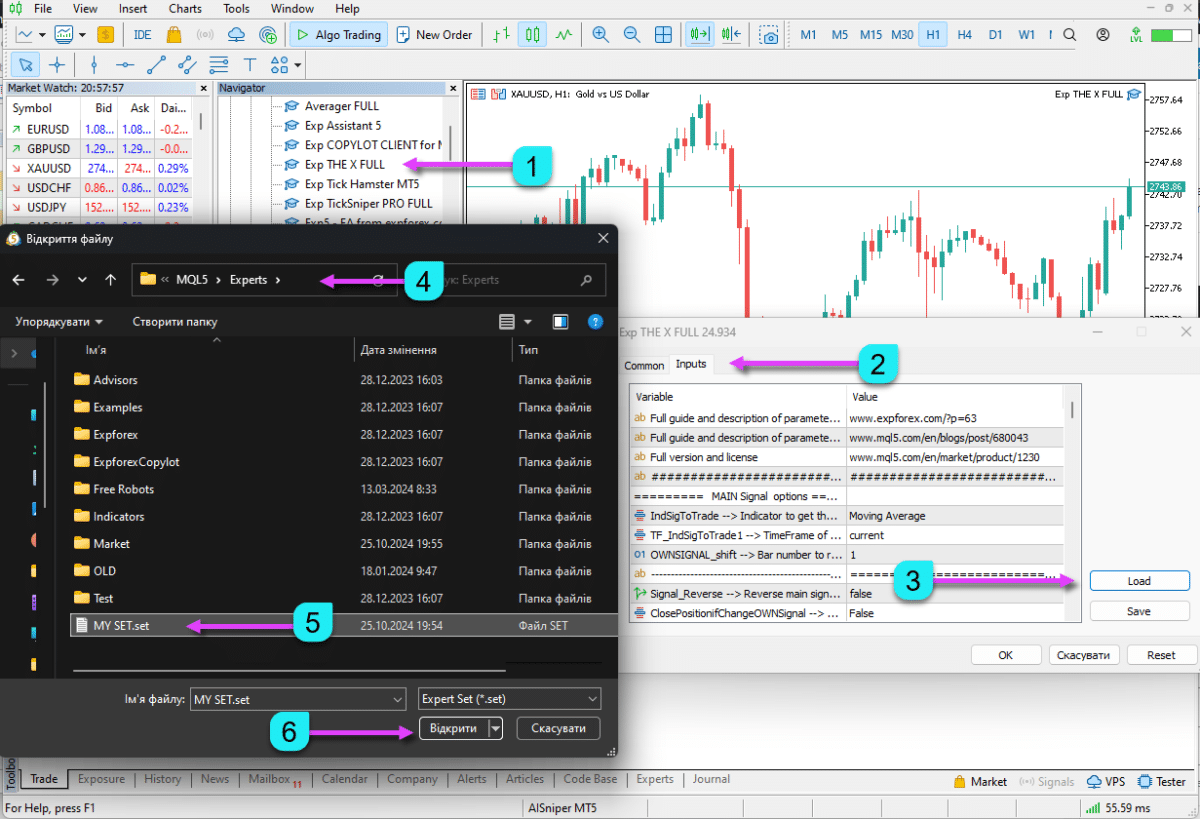
Loading the Configuration File (SET File) in Our Expert on a Real Chart:
Once you’ve finalized your settings and the optimization results are satisfactory, you can load the expert with these settings for live trading.
Remember! Optimization is a rough method for searching settings, and optimization results do not guarantee future profitability in real-time trading!
I recommend testing the system first on a demo account with your broker using these settings.
Afterward, you can open a cent account or a small deposit for verification.
Only after extensive testing should you trade with large deposits!
Download our expert onto the chart.
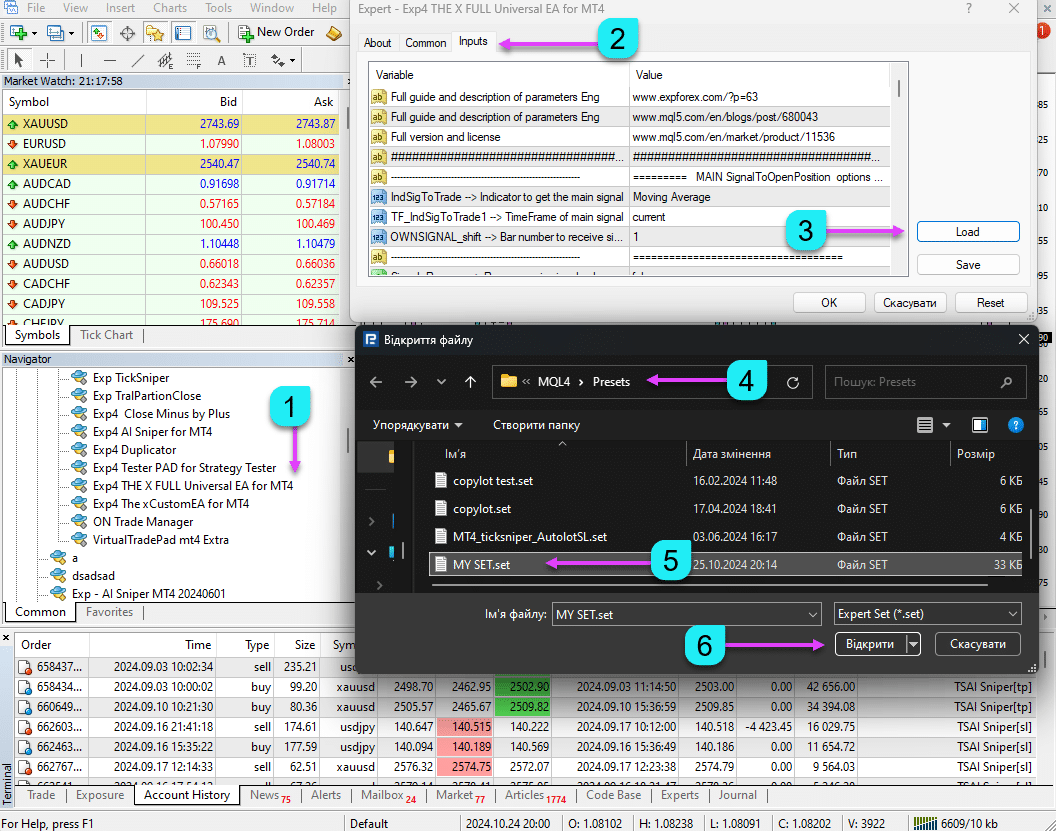
Go to the Settings tab (Inputs).
Click LOAD (Load).
Open the folder where your settings files are stored.
Select a file and click Open.
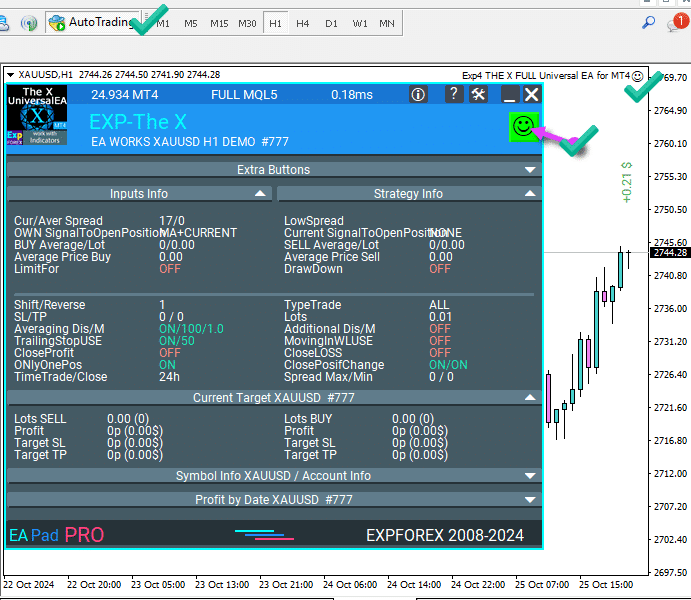
If you did everything correctly, the graph will display our EAPADPRO panel with a green smiley face!
If something is not installed or installed incorrectly, you can read about the reasons for the advisor not trading in our article: Does EAPADPRO Work with Advisors?
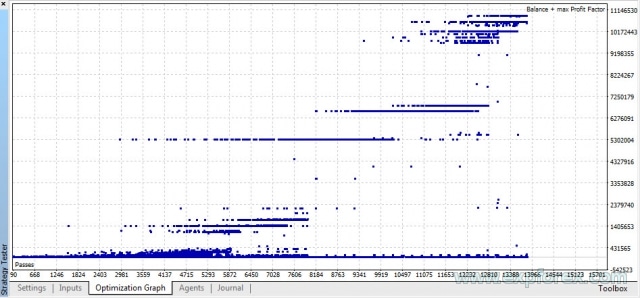
MetaTrader 5: Optimization Results
Optimization of all parameters can be done in 2-3 days.
It’s time-consuming, but you’ll receive the results of all passes.
For more than 20,000 passes, we spent about $6 on optimization. You can adjust the number of passes by limiting the number of optimization parameters.
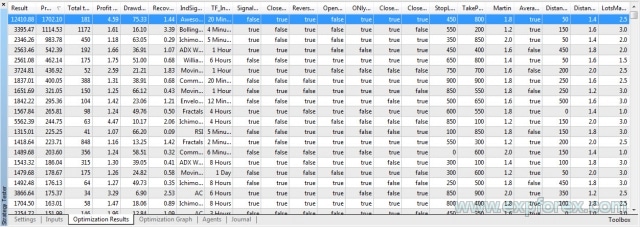
When writing the article, we will follow the examples.
Let’s say we obtained results from our optimization.
We select the Profit column and sort the results by the highest profit.
You can conduct a single run of results to generate a complete report on the items.
After the testing is completed, we will get results that we can rely on.
And if they suit us, then we can save the settings!
Remember: Test results are only 99% accurate. In real accounts, you may experience order execution delays, slippage, power outages, and other factors.
Multicurrency Testing and Optimization in the MetaTrader 5 Strategy Tester
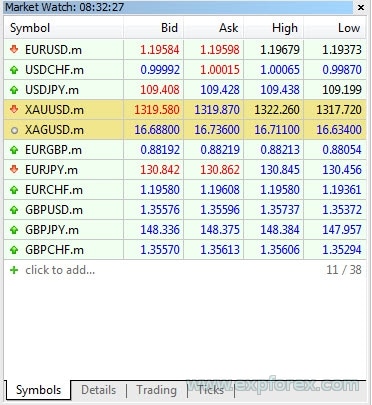
After these actions, I recommend testing these settings on other currency pairs. To do this, in the Market Watch, add only those currency pairs that you consider primary and that you can trade:
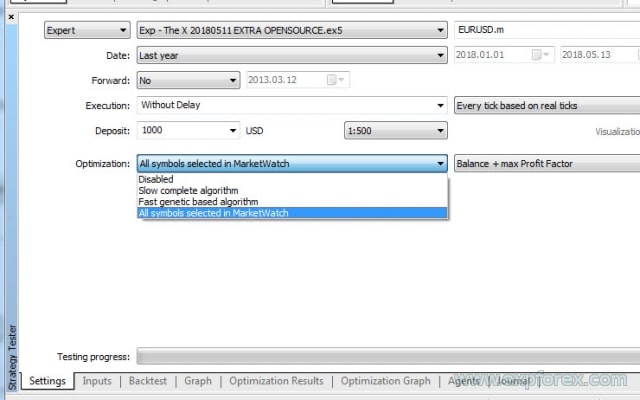
Customize the optimization by symbols:
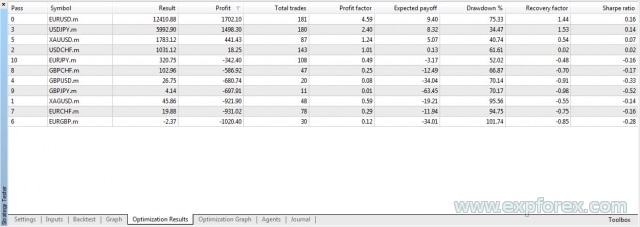
Run the optimization and view the results:
These actions aim to find universal parameters for the Expert Advisor to use on any currency pair.
As you can see from the optimization results for currency pairs, this set of settings yields good results in only 4 out of 11 currencies!
MetaTrader 4: Setting Up Optimization and Saving the SET File
Note: The Strategy Tester in MetaTrader 4 is not accurate and does not account for floating spreads and execution delays, so its results are only indicative!
To optimize an Expert Advisor, you need to open the Optimizer MT4.
After that, we need to adjust our Strategy Tester for optimization:
Choose an Expert Advisor for optimization.
Select the trading symbol (currency pair) for which you want to obtain results.
Ensure to choose the model: “Every Tick!”
Period optimization (optimize over the last year; optimizing for over 10 years makes no sense!)
Timeframe
Set the tick on Optimization
Enter the input parameters settings Inputs.
Load your file to optimize or configure the settings to your liking!
Click the right mouse button – Load (Load)
Choose the path where you saved our files and select the file with the number of digits in price from your broker (4-digit or 5-digit broker).
Configuring Optimized Parameters:
After loading, you will see our optimization options.
Check or uncheck the options you want to optimize. (By default, the file is set up to optimize all important parameters)
Start (Start) – The initial value of the parameter to optimize.
Step (Step) – The incremental change in the parameter with each optimizer run.
Stop (Stop) – The final value of the parameter to optimize.
Click Start to begin the optimization! It can take anywhere from 1 hour to 1 week! You can also use the cloud to optimize faster!
Remember! The more parameters and steps you optimize, the more time is needed to complete the testing and optimization!
Value (Value) – This is a fixed value. The Advisor will use this value if the parameter is not optimized or during testing!
Enable Cloud Optimization available only in the MT5.
I highly recommend enabling Cloud Optimization!
This way, my processor remains free, and my computer does not slow down during optimization. Additionally, the cost of one pass in the cloud is less than 0.01 cents!
Press the START button and continue with your tasks!
Selecting Results and Saving the “.Set” File
After receiving the optimization results, you can select the desired options and save the SET File for future use.
Go to the Optimization Results tab.
Choose the desired result.
Apply settings for testing.
Run a Single Test:
Review the result:
After that, go to the Settings tab (Inputs) and save the SET FILE.
Save the settings file in a location where you store all your important files!
Loading the Configuration File (SET File) in Our Expert on a Real Chart:
Once you’ve finalized your settings and the optimization results are satisfactory, you can load the expert with these settings for live trading.
Remember!Optimization is a rough method for searching settings, and optimization results do not guarantee future profitability in real-time trading!
I recommend testing the system first on a demo account with your broker using these settings.
Afterward, you can open a cent account or a small deposit for verification.
Only after extensive testing should you trade with large deposits!
Install our expert onto the chart.
Go to the Settings tab (Inputs).
Click LOAD (Load).
Open the folder where your settings files are stored.
Select a file and click Open.
If you did everything correctly, the graph will display our EAPADPRO panel with a green smiley face!
If something is not installed or is installed incorrectly, you can read about the reasons why the advisor is not trading in our article: Does EAPADPRO Work with Advisors?
FAQ: Question and Answer
1. Why do the test results vary across different brokers?
– Different brokers have different quote providers, which results in varying test outcomes. – Each broker has its own spread, swap, commission, settlement method, execution, and account type specifications, leading to significant differences in test results.
Questions?
If you have any questions, please feel free to ask. We do not sell the pig in a poke.
Each of our products can be tested before purchase.
We appreciate your interest and trust in our products and strive to maintain high quality standards.
11 responses to “Testing and optimization of EA in Strategy Tester”
jp
i just bought tick sniper, my account has 1:1000 leverage i tried it on backtest it lost no settings are changed. im afraid to start it on my real account. i need advice thanks
Hi! Thanks for your message.
Please note that TickSniper cannot be tested in the MT4/MT5 Strategy Tester — backtest results are not real and do not reflect the actual performance of the robot. TickSniper works only on real live ticks, and the tester cannot simulate them correctly.
Trading always carries risk, and no one can guarantee profit.
If you want to try it safely, please start on a real account with the minimum lot size, monitor spread and execution, and only then increase the risk if you are comfortable.
You can use Expert Advisor on any symbol that is available in MetaTrader. You just need to install Expert Advisor on the symbol chart, everything else will be set up automatically by Expert Advisor.
I just subscribed to Exp5 AI Sniper for MT5, I want to ask if I can use it for trading btcusd and binary, if possible, please give me instructions, thank you, good luck
I just subscribed to Exp5 AI Sniper for MT5, I want to ask if I can use it for trading btcusd and binary, if possible, please give me instructions, thank you, good luck
I just subscribed to Exp5 AI Sniper for MT5, I want to ask if I can use it for trading btcusd and binary, if possible, please give me instructions, thank you, good luck
I just subscribed to Exp5 AI Sniper for MT5, I want to ask if I can use it for trading btcusd and binary, if possible, please give me instructions, thank you, good luck
I just subscribed to Exp5 AI Sniper for MT5, I want to ask if I can use it for trading btcusd and binary, if possible, please give me instructions, thank you, good luck
I just subscribed to Exp5 AI Sniper for MT5, I want to ask if I can use it for trading btcusd and binary, if possible, please give me instructions, thank you, good luck
I just subscribed to Exp5 AI Sniper for MT5, I want to ask if I can use it for trading btcusd and binary, if possible, please give me instructions, thank you, good luck
We use cookies to improve your experience, analyse traffic, and personalise content. You can accept all cookies or customize your preferences.
Cookies are small text files that can be used by websites to make a user's experience more efficient.
The law states that we can store cookies on your device if they are strictly necessary for the operation of this site. For all other types of cookies, we need your permission. This means that cookies categorized as necessary are processed based on GDPR Art. 6 (1) (f). All other cookies, including preferences, analytics, and marketing cookies, are processed based on GDPR Art. 6 (1) (a).
This site uses different types of cookies. Some cookies are placed by third-party services that appear on our pages.
You can change or withdraw your consent at any time from the Cookie Declaration on our website.
Learn more about who we are, how you can contact us, and how we process personal data in our Data Protection Policy and Disclaimer.
Please state your consent ID and date when you contact us regarding your consent.
Lorem ipsum dolor sit amet, consectetur adipiscing elit, sed do eiusmod tempor incididunt ut labore et dolore magna aliqua. Ut enim ad minim veniam, quis nostrud exercitation ullamco laboris nisi ut aliquip ex ea commodo consequat. Duis aute irure dolor in reprehenderit in voluptate velit esse cillum dolore eu fugiat nulla pariatur. Excepteur sint occaecat cupidatat non proident, sunt in culpa qui officia deserunt mollit anim id est laborum.


Leave a Reply